
Under the bridge, completely enveloped in shadow...
Are you ever frustrated by scenes that are too dynamically diverse having to lose your highlight and shadow info to expose for the midtone ultimately losing the shadows to dark noisy areas and blowing out your highlights resulting in detail-less white blotches? I think that I can help. This isn’t the only HDR or Photomatix tutorial on the web, but you’re here, and it’s free. Regardless of how you feel about some of the HDR imagery that can bombard the senses, combined with the proper capture technique HDR software can help achieve, photographically ,the dynamic range that the human eye is capable of seeing. By using this method of combining bracketed exposures, you can save yourself hours of dodging and burning, masking and aligning in Photoshop, with simple HDR software, or you can create your own fantasy cartoonish grunge-scape if that’s what you’re after. I will walk you through step by step instructions regarding the proper capture and postprocessing techniques using the popular HDR software, Photomatix from HDRsoft. I also have a discount code to offer you 15% off (TRP15) if you choose to purchase the software. To follow along, Photomatix is available as a non-expiring full free download (it will just watermark your images) to use and feel out the benefits to this very popular tool in digital photography. Read on for links, techniques and a software discount…
Now, I will admit, I’ve personally held off on HDR imagery for the last couple years as I found many of the images I saw to be over the top for my taste. I have no problems with the over the top HDR stuff, I just felt it would come across as more gimmick in my work than being as useful as I’ve now found it to be, but who am I to say? As in the example image above, I was completely obscured from the sun and shooting in near darkness compared to what the sky was metering at. The technique enabled me to create an image that more or less balanced the exposure so that it looked very similar to what my eyes were able to see. More and more, this technique is being adopted by many different types of shooters and the diverse “look” can be very effectively marketable in a commercial sense. The depth in processing power of the Photomatix software enables a wide range of effects ranging from the downright over-haloed grunge look to beautifully blended dynamic scenery. I have realized with my shotgun tour with this software, there is an amazing amount of possibility in it, enabling photographers of different cloth to utilize it’s capabilities to different effect. I’m sure throughout the history of photography, many techniques have come across opposition. Nix that, visual art in its many iterations in general. Beauty is in the eye of the beholder, to each their own so on and so forth. It is a digital tool, and can be profound and very useful in a variety of applications. Truth of the matter is a digital camera is only capable of capturing a certain amount of dynamic range, and developing this type of a digital tool can help in situations where your scene can’t be truly realized without some digital tweaking. You, don’t need to use it, but it doesn’t hurt to at least understand it. Chances are, if you’re using (or would like to be using) photography for income, a client may reference HDR, their project may require some form of bracketed combination, or having seen an image utilizing HDR, want to recreate it for their purposes. That said, here’s a quick and easy walk through to get you started. I will disclose, I’ve only been using this software for the last couple weeks, so my experience is very limited. There are very skilled photographers out there that have dedicated years to the refinement of this technique, so, while I’m no expert, I feel that I have a basic grasp on the concept and hopefully can provide you with enough of a push to take the leap if you so choose. To give a quick example, here are two images used in the series to create the final image above, one exposing for the darker areas, and one properly exposing the sky, neither of which do the scene justice…

Exposing for the dark areas under the bridge

Exposing for detail in the sky
Okay, high dynamic range imagery is merely a technique in which you are attempting to capture detail throughout the dynamic range of the image. For instance, have you ever taken a picture of a landscape where you exposed for the beautiful sunset only to watch the entire scene below the horizon stack up to the left of your histogram in dark silhouetted shadow? This is one major example where HDR software can help.
For instance, this…

+ this

= this.

I found these two original pictures that I’d taken without really anticipating combining them via Photomatix, as they were handheld, and not properly framed, but Photomatix did well none the less at aligning them and blending two exposures.
Without getting too deep into the technical aspects of local vs global tone mapping and it’s relationship to dynamic range algorithms in these software applications, I will walk you through my simple technique to capture imagery with the idea that you will be utilizing Photomatix, or a similar program. What you do with it once you’ve captured and converted it, is entirely up to you.
If you do not already have Photomatix, feel free to download the full free version here. You will end up with a finished image just as you would with the paid version, the only difference is the ‘photomatix’ watermark that will be placed on your image. If you find this to be something you would like to purchase, input “TRP15” at checkout and it will get you 15% off. If you choose to purchase a license, all you have to do is input the license code that you receive via email after making a payment and it eliminates the watermark.
Lets start with the proper capture technique. We are going to be taking a series of frames of the same scene capturing as much of the dynamic range as necessary through our exposure bracketing. Firstly, I feel that RAW capture yields better results for HDR imagery. In 12 or 14 bits per channel as opposed to 8 for JPEG, you get more info to work with. It isn’t necessary as I had some good luck with shooting JPEG on my GF1, but for optimal results and generally speaking, more info is better, especially when you are trying to capture as much info per pixel as you can to capture dynamic range and smooth tonal gradation in any particular scene. For the best and most consistent results, you should use a tripod. Assuming you’ve curbed your coffee intake and have a monk like breathing technique, you can attempt a hand held series, but for me, I like the tripod method. Here is how I suggest to set things up:
•Set to your camera’s native ISO setting (normally ISO 100 or 200) as most cameras offer the best resolution and lowest signal to noise ratio here.
•Set your white balance to a particular setting (not AWB) as you don’t want it to shift from exposure to exposure.
•Set your camera up on either (M)anual if you are going to adjust the stops by way of your shutter speed yourself, or (A)perture priority setting if you are going to go the way of auto bracketing, ensuring that your DOF will not vary through the exposures. (want help with
shooting on Manual?)
•Depending on the desired effect DOF wise, establish your Aperture setting and keep it constant. I’d say f/8-f/16 or so would be my “starting point” for most applications, but use this as an artistic variable to your discretion. In my experience, the deeper the dof and sharper the scene’s focus from foreground on, the more realistic the effect as it helps minimize ghosting and halos in areas that aren’t in sharp, or near sharp focus.
•I use spot metering to take a reading from the brightest bright and the darkest dark in the scene I am going to capture, noting the shutter speeds that register for proper exposure at the aperture I’ve set to establish my “bookend” exposures.
•Finally, I switch to Manual Focus and get it to where I want it. I level off the tripod, place the camera on there, and frame the scene.
Here is where your option to shoot an auto bracket on continuous drive mode, or to manually adjust your shutter speed come into play. Depending on your camera’s range within it’s auto bracketing, usually you can get a range of up to 4 stops (-2, -1, 0, +1, +2) in a series of 3, 5 or 7 shots usually adjustable within these 4 stops in 1/3 stop increments. Whether the exposure at each of these settings will capture enough of the highlights and shadows depends on the scene and what you’ve metered off of to establish your basis for mid-tone. My rule of thumb has been, that I want the brightest highlights, and darkest shadows to register at “0” on my light meter so that I make sure I have the latitude in my exposure range to not only avoid clipping, but to really bring out the information in those areas. I do this by spot metering from the highlights and shadows in the scene paying attention to what the shutter speed registers at. I can always choose to bring the highlights and/or shadows back up or down later in post processing, but if I lose that info in the exposure, it’s harder to fudge later on. For this reason, I like to manually adjust my bracketing and do so one stop at a time enabling me as many full stops as I need to capture the scene’s dynamic range (where most auto exposure bracketing gives you only a 4 stop range for midtone). In scenes where there is quite a large difference between the highlights and shadows, I may shoot as many as 7 shots in one stop increments (or more), and where the scene isn’t quite as dynamic, I will only need 3-5 exposures to achieve my dynamic range.
Determining the dynamic range of the scene: Use your
metering method of choice, but I’ve found spot metering to be the most helpful for me when manually bracketing. With my camera set to Manual, I establish the aperture that I am going to use. I then place the spot on the brightest element in the scene and adjust the shutter speed so that I achieve a midtone meter reading (“0” on the light meter) and make note of the shutter speed it will take to get me there. I then spot meter off of the darkest area within the scene and follow the same procedure. Once I’ve noted my “bookended” exposures I then set the camera up on the tripod and start with one or the other and incrementally adjust exposures by one stop after each shutter actuation until I get to the other “bookend” exposure setting. For example, if my shadows in the scene metered at f/8 and 1/15 sec for proper exposure, and my highlights metered at f/8 and 1/1000 sec, keeping my aperture constant, I would take my first shot at say that 1/15 sec, my second shot one full stop faster at 1/30 sec, my third at 1/60 sec, fourth at 1/125 sec, fifth at 1/250 sec, sixth at 1/500 sec, and my seventh at 1/1000 sec. This is a seven stop swing which has also allowed a two stop buffer on either side as I metered for mid-tone on both my highlights and shadows giving me a little breathing room that I can bring up or down later on when I’ve processed the image in Photomatix if I choose (by metering for midtone, my camera usually will allow for about two stops on either side of that reading safely without the fear of clipping). The scene may need 5 exposures, or it may only need 2 perhaps if the light is fairly flat throughout the scene. This is how you are able to determine just how much the light in the scene differs.
Once you’ve determined your method of bracketing (either by way of manual exposure like me, or Auto Exposure Bracketing/AEB – check your camera’s manual if you’re not familiar), look to setting up the camera as stably as possible. For maximum sharpness you can utilize mirror lockup and I would suggest either a self timer, wireless trigger or shutter release cable to minimize movement of the camera between frames. This is another reason many like the auto exposure bracketing as I still need to physically touch my camera between shots if I am to adjust the shutter speed, but I have been using a 2 second timer so that I’m not touching the camera as it fires. This method is slower and can be problematic with even slowly moving elements like clouds, etc. If you feel so inclined, try both methods to see what works and produces the best results for you, and it may change from one scene to the next based on need. One thing to keep an eye on if using AEB is how the camera is metering. It may be good to start by trying to use an Evaluative/Matrix style metering as with AEB it establishes your exposures based on the metering at the time of engaging the shutter unless you’ve locked the exposure and would do so effectively averaging the light in the entire scene. One thing to look for regardless, is after the pictures have been shot, review the histogram and make sure you’ve not clipped the shadow info in your brightest/most over exposed frame, and also not clipped your highlight info in the darkest/most underexposed frame. If this is greek to you, read the top of the
metering post where I’ve briefly explained the histogram and clipping.
Now, let’s process our images using Photomatix. After capturing your image files, you load them onto your computer and have a couple different options. (don’t alter or adjust your image files yet as you need them to all be the same size, format, etc so that they can be easily lined up inside Photomatix) If you use Photoshop, Aperture or Lightroom, you can use the Photomatix plugin (included in the pro bundle for $20 more), or you can export the image files (I’d suggest 16bit Tiffs) to the desktop, or folder that you can easily find during the import dialogue for Photomatix. Open up Photomatix and you will be prompted to import image files. Choose all of your files that were captured for one scene’s exposure cycle (ie: if you have two or more different sequences, only import one sequence at a time). From here, Photomatix works its magic. From the top:
•Open Photomatix and click “Generate HDR Image” Chose your image files.
•Check the “Align Source Images” box. Even if you’ve been remarkably still, it doesn’t hurt to have this double check and align all of your images. Choose between the two options based on whichever best describes your scene.
•You can choose to tick the boxes to reduce chromatic aberrations, noise and artifacts. I’ve found that as long as I’ve captured the frames as described above, I have had better luck using other software to reduce noise, artifacts and aberrations. While Photomatix does a good general job at it, I personally prefer to do it later as I do my fine tuning in Photoshop, but by all means, as long as you have a couple extra minutes to allow these stages to process, give them a try.
•Unless you really want to work on tweaking the information on a pixel by pixel level after the fact, I would suggest using the recommended “take tone curve of color profile” option.
•Click “Generate HDR”
As you will see, you end up with a strange looking, unprocessed image at first.
•Click “Tone Mapping” in the pop up dialogue. This sends you to the drawing board so to speak. From here we will fine tune our HDR image and it is really just a matter of taste.
•You have two options at this point with the tabs at the top of the adjustment tool bar. “Detail Enhancer” and “Tone Compressor.” You can only process the image in one or the other. My experience seemed to really benefit from using the tools available in the Detail Enhancer as the Tone Compressor takes a bit more work to get an image to where I wanted it and really didn’t provide me with results that I wasn’t able to get processing an HDR image in Photoshop’s “merge to HDR” action (which is pretty limited in my opinion.)
I will go through the tools in the Detail Enhancer as I believe it is where the main meat and potatoes in Photomatix exist. By all means play around with the Tone Compressor as well. Again, it is all a matter of personal taste.
•One of the big tools in the Detail Enhancer is the Strength slider. (this along with the “smoothing” slider are the biggies) Give the slider a go to see the difference from one end to the other.
•Saturation is pretty self explanatory. I like to get it close to where I want it here without going overboard, knowing that I can fine tune in Photoshop or another software later on.
•Luminosity will globally change the overall lightness of the image so to speak. Play with it, but again, a more precise curves adjustment later in PS can provide more control.
•Microcontrast, will adjust the contrast on a much finer level. It may not appear to make a huge difference until you look at a magnified portion of your image.
•With the Smoothing slider (the other of the big two sliders), I like to click on the “light mode” check box which gives you 5 levels. From the left, or minimum setting, you get less “smoothing” creating more global contrast and the more cartoony surreal look while to the right you get a much more real world look. I tend to like the middle of the road with this unless I’ve got a particular vision for the image which would benefit from one extreme or the other. This along with the Strength slider provide the most major tools unavailable in such ease in other software and when used in concert unlock the potential of the software.
•Next, you’re on to Tone Settings where you can adjust your white point, black point and gamma settings. I will adjust these in small increments getting the image to where I feel they look best keeping an eye on noise and color balance. Salt and pepper as it were. Season to taste.
•Color Settings come next. Assuming you kept an eye on your white balance during capture, there should be fairly little adjustment here needed. You are also able to adjust the saturation in your highlights and shadows here. If you would like to adjust then it is another season to taste set of sliders.
•With Miscellaneous Settings, keep an eye on your histogram. You are ultimately pushing your highlights and shadows to their respective edges here. A little tweaking is handy, but again, for major luminance and tonal adjustments, I would look to an adjustment in Photoshop or other software where you have the ability to adjust on a finer level.
At the bottom of the dialogue, you can undo the last adjustment, revert back to default settings, or chose a preset. The presets are a handy way to see how different combo’s create different looks. Watch the sliders as you change between presets. A useful technique is to set a preset, then tweak the sliders to your liking and saving that as a preset of your own for a quick go to in the future. If you would like to capture a series of images to combine later down the road as a stitched panorama or just keep as a consistently processed series of individual shots, creating a preset of your own can be handy so that you know that the final images are all at the same levels.
If you want to go the way of the more surreal style HDR imagery, try upping the strength, saturation and adjust your light smoothing slider down toward the minimum side of things. You can end up with more grungy results like this:
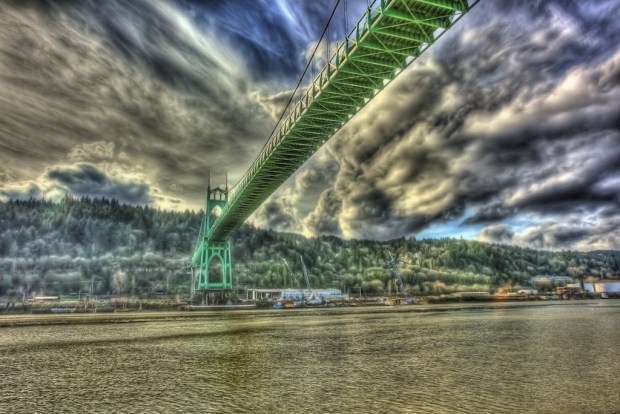
- More of the ‘grunge’ look.
Going in the opposite direction, you can take the same info and create a fairly realistic representation of the scenery which would have been impossible to achieve in one exposure (in this scene’s case anyway) by adjusting it like so:
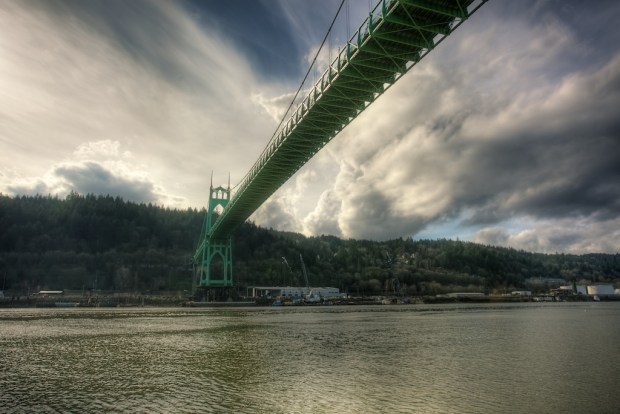
A more natural approach.
Here is one more where I kind of went down the middle.
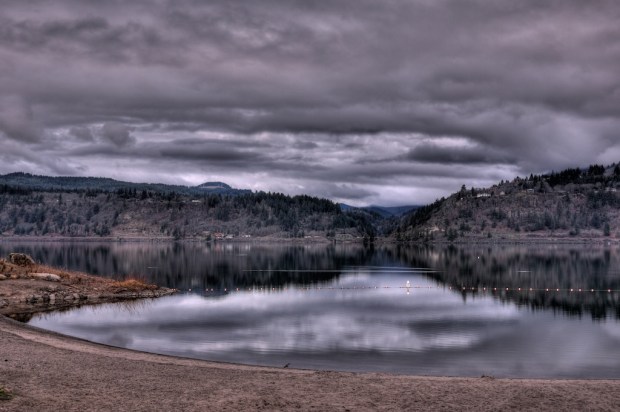
- A dash of surrealism mixed with a touch of reality.
Or, bring out the range in an otherwise flat, frozen cityscape.

My heart over Gotham.
I have to admit, I wasn’t entirely sold on HDR imagery until I really started to play around with Photomatix. I’d enjoyed some of the outlandish and more surreal concoctions that I’d come across, but felt that too often, it was over done. Now, I feel like I’ve probably seen so many images utilizing this technique without even knowing it. If done subtly, you can provide the viewer with an image that encapsulates the entire tonal range of a scene without making it look like you’ve had to process it. Or you can go over the top and provide a more dreamlike scene.
There are alternative products available, but Photomatix has become the gold standard within the industry. With Photoshop, arguably the single most indispensable piece of software available to the photographic community, it’s merge to HDR automation is very limited. This is where plugins and supplemental software can really enhance your skill set. Where I see Photomatix to be of the greatest benefit for me is capturing both urban and natural landscape as well as my interior and architectural type shoots. With the Photomatix full “Pro” version costing less than a decent split density filter, it has already more than paid for itself for me. Not only have I been able to capture the entire tonal range in any given scene, but it doesn’t require me to adjust my composition based on the positioning of a split density filter for instance. Coupled with this, it also opens up a huge amount of room for “artistic” interpretation by way of some of the more surreal capabilities this software provides. Give it a try. It may not be for you, as it wasn’t for me, until I used it.
HDRSoft has just recently released a “light” version which gives you the same controls with a few less options. (one big one is only allowing 3 different exposures as opposed to an unlimited amount in the Pro version). But, when the ‘Light’ version goes for $39, it could be a pretty easily justifiable splurge.
For those who are interested, if you purchase any version of the software, input this code “TRP15” for a 15% discount at checkout bringing this already reasonably priced digital tool down even more. The coupon has to be entered in the ‘Coupon Code’ field of the order form that shows after having clicked on one of the “Buy” buttons of the purchase page of the website. The discount will work for any of the versions. Add to that, once you have purchased a license, you can use that code on any one computer at a time, meaning you wont have to re-buy the software if and when you replace your computer.
If you don’t already use Photomatix, I suggest playing around with the free trial version to see it in action before committing to forking out the cash, but honestly, I think that it provides an indispensable tool, for a very small amount of dough. I know it is a tool that I will continue to use for applications, both personal and professional, for some time to come.
Share this article and it's images:
Related


Pingback: Metering and Exposure Compensation. Which, when, why? « Tyson Robichaud Photo-blography
Thank you for the tutorial, and the rest of your site is helpful too. I am just learning computer processing as far as HDR and Elements 7 goes, so every bit of info I can find is great!
LikeLike
Hi Judith! Thanks for stopping by, and glad that it seems to have helped. Software and postprocessing can be overwhelming (many techniques still are to me). I’m trying to put these tutorials together to be easy enough to follow without prior (or minimal) knowledge necessary. I have a few irons in the fire with photoshop and lighting coming up so hopefully I can continue to help!
Cheers,
Tyson
LikeLike
Pingback: *A thank you to many, or, why I think the internet is cool. « Tyson Robichaud Photo-blography
Thank you for this wonderful HDR tutorial. I’ve just been getting into using Photomatix and I’m so happy to find good information out there to improve my understanding of the program.
LikeLike
Hi Rachael,
I’m happy that it is of use to you! I tried to put it together from my own vantage point being a complete beginner myself. Hopefully that translated!
Keep on shootin’!
Cheers,
Tyson
LikeLike
Pingback: *Sony NEX5 vs. Panasonic GF1, the showdown. «
Pingback: *Adding an ‘aged’ feel to your photographs. «
Pingback: *HDR 101, pt 1 – Capturing Dynamic Range «
Pingback: *HDR 101, Part 2 – Processing Dynamic Range «
Pingback: Dynamic Colors Look!
Pingback: *Everything you need to know about digital photography. Two years of tips, tricks and various freebies, revisited. «
Pingback: *Shooting a residential project for the ELK Collective | Tyson Robichaud Photo-blography
Pingback: *The Mirrorless Diet, how to lose weight instantly! Part 3 | Tyson Robichaud Photo-blography