

With so many on line communities, forums and storage based solutions for photographers, we tend to share our images with far more people than we may be aware of. I use flickr and have for years. I have always kept my shared images on flickr to a maximum of 640 pixels by 640 pixels to minimize any actual usefulness to anyone who may want to steal them. Now that flickr is seemingly trying to trick us into sharing larger files by giving us more showcase room, I feel uncomfortable putting certain images out there in any sizable way. I’ve always been very cautious what I’ve put on there, largely because I know it has become the largest illegal stock stealing site the internet has ever seen. Okay, that may be a bit of projective assumption, but I have had a few images stolen (that I am aware of) and used illegally. The worst offender was a Nikon and Microsoft sponsored photography contest in the UK where I was alerted that three of my images were being used on the front page a few years back, without even a sniff of permission. Yeah, a photography contest using stolen images… Anyhoo, c’mon in and I’ll show you how to create a quick action in photoshop where you can easily replicate a watermark with one click…
So, I know that watermarking is a subject of great debate, and I for one dislike seeing watermarks ruin a beautiful image, but the reality of our times has shown that sometimes it is better to safeguard our images, at least when they are being shared on completely open sites that allow anyone to easily search for, screen capture, or grab images at will. Sure you can crop it out, and in some cases, Photoshop’s content aware fill will do a great job at eliminating it, but with this in mind, you can place your watermark carefully as to not interfere with the content, but also be placed in such a way that it would be difficult to remove and keep with the compositional dimensions and avoid cropping important subject matter.
A big thing in any visual medium for an individual artist, especially for something as personal as photography is consistency and recognizable branding. If your watermark changes in appearance every other time you use it, it will look messy and come across as an afterthought. I’ve struggled with this a bit, but have settled on a particular font and formatting for mine which allows me to replicate it between programs if the need arises. This is a simple, text watermark as I prefer to minimize any visual distraction by avoiding logos and the like. Many others will take a more aggressive or marketing based approach, and to each their own. One way I apply a watermark is by having an action in photoshop which I can easily apply to any image, then through free transform I can adjust the size and placement, as well as adjust the overall opacity, change the color to suit the image, etc. Here’s how:
To start, in Photoshop, select your Type tool (press “T”) and figure out the font, color and font size you’d like to start with. I’d say avoid comic sans. Choose something in a whiteish tone, somewhere in the neighborhood of 36-48pt in font size to begin with (you can easily resize this later, I’ll show you how). Okay, now that we have the general look figured out, here’s how to record your action:
Add a new action and record that action son!
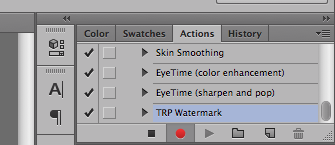
- First, with your image open in Photoshop, navigate to your Actions panel.
- Next, select the “Create New Action” icon at the bottom of the Actions panel (it’s the page with the folded over corner).
- Then, name the action (I named mine “TRP Watermark”) and press the dot/record action button (which will then turn red) at the bottom of the panel.
- With the action recording, press the “T” key to select your Type Tool, and click anywhere in the image (I chose the dead middle as my default).
- Finally, type your name, business, or whatever you’d like to have your watermark say and press the Stop button (black square next to the red record dot).
*If you’d like to add a copyright symbol like so: ©, just press ALT/OPTION + G.
That’s it.
Now, you have an action that when used will place this very watermark in this very spot in your image. If you use this action on images of different sizes (pixel dimensions) the font size will appear larger or smaller depending, and you probably don’t want your watermark dead center, or even in the same exact location for each shot because hopefully every one of your images is composed a little differently showcasing differing areas of negative space and the like.

Pressing Command (Cntrl) + T will bring up the Free Transform box
With this in mind, after you’ve run your action, and with your text layer selected in your layers panel, press COMMAND (CONTROL in Windows) plus “T” for the free transform handles. From here you can reposition and resize your watermark. To keep the proportions consistent, hold down SHIFT, grab and drag one of the corner handles to resize. Once you’ve resized and dragged your watermark to where you’d like it, press return to finalize the free transform and you’re set!

don’t forget to adjust opacity, color and location to suit your image.
Other options is to then adjust the opacity of your watermark layer, and I even like to add a mask and use a light linear gradient to erase some of the watermark from one direction or another. If you need to change the color of the text, easy! Just select the Text Tool, make sure your text layer is selected in your layers panel, highlight the text by hovering over the text in your image, clicking and dragging to select it, and change the color by way of the color picker at the very top of the screen!
The world is your oyster. Go forth and (tastefully) watermark the crap out of your images!!!
Happy shooting!
Tyson

I uploaded just 700 x 700 px… The most scarriest thing for me is not about stolen… But what will happen if my pics are used in adult sites! 🙂
Thanks for sharing this. Im so easily boring wid my watermark. Sometimes i put in my pics sometimes not. Sometimesi change the fonts or not. Love reading what your thoughts. Inspirative.
LikeLike
Hi Inna!
I know, it’s a little nerve wracking when sharing images online, but there is just the inevitable possibility that things are stolen and used. The best way to safeguard ourselves is to not put anything online, but that is no fun 🙂 For me, a smaller image, or a watermarked image at around 1000pix can provide a slightly larger, higher resolution image and then, I try and really limit and edit what I do choose to share. I always also imbed my name under the copyright field when importing the images onto the computer via the exif data, and even have the ability to add my copyright in camera on a couple of the cams too.
I hope you’re doing well!
Best,
t
LikeLike
ok… i will do it 🙂
LikeLike
I know what i’ll be doing this weekend, theres a feature on lightroom thatll let me do the same, i’ll have a play. Ive been meaning to this for a while but your post will give me the kick i need!
Thanks Tyson, helpful as always
LikeLike