

Hello all and welcome to a brand new level of interactive fun and collaborative learning. I have always enjoyed a group approach to many aspects of creative projects, and in this vein, I’ve asked a couple friends to join in so that we can share our photography with a larger audience.
The idea is to create a theme each month. Anyone who’d like to participate is welcome to do so. We think it would be fun to share our setups, gear used and settings so that we all learn from each other’s approach to each given topic all while introducing our photography to a larger family.
We will have a specified amount of time to participate and once done, we will share these images on flickr via a theme thread in our respective flickr groups.
Heather and Mat from Mirrorlessons, and myself will choose our faves from the entries and will open them up for a vote for anyone and everyone to vote on via our respective blogs, showcasing your images, linked back to your photo stream on flickr. The final winner will then get to pick the theme for the next round and it begins again. This will be a fun way for us to share our imagery with a larger group, with the idea being that we continue to grow our community, further networking with and inspiring each other through this collective, creative process.
This month, as our first challenge, it is to create an image with a subject lit by a single light. “Single light” can be any singular light source and the subject can be anything. (Hint, the sun can be a single light source, a flashlight, a strobe, a lamp, a phone, a lighter can all be considered a single light source, but it must be evident that the subject is being lit solely by this singular light source.
Feel free to take this theme and run with it, just make sure to link your image in the TRP FLICKR group in THIS THREAD and in the MIRRORLESSONS FLICKR group in THIS THREAD on flickr to submit it. You can submit images for this first challenge through the end of March (the 31st). At that time, Heather, Mat and myself will choose our three favorite images submitted to the Flickr groups and post on both blogs so that we can all vote for our favorite.
Inside are a couple of examples through a brief, simple turotial to show how a single light can change the effect on a single portrait subject, come on in:
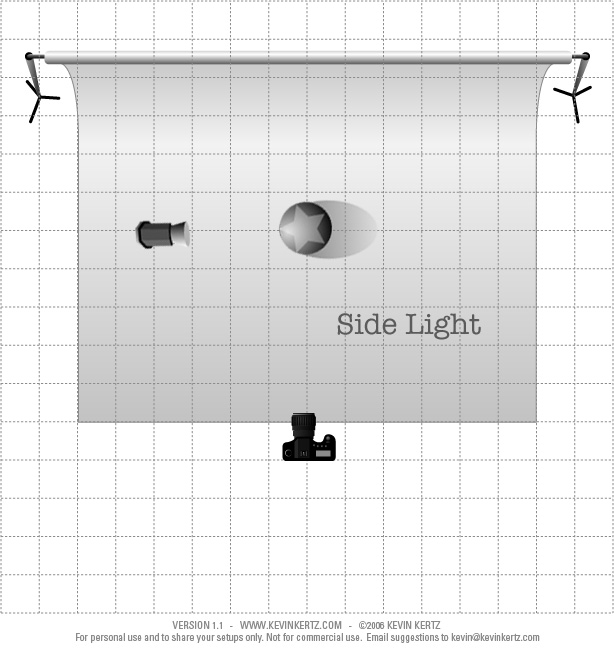
Each image below has a diagram following it (See KevinKurtz.com to download his lighting diagram!) along with an explanation. This entire shoot took Mrs. Squeeze and I three and a half minutes total (the lil’ns demand we never stop paying attention to them for much longer than that) so this is certainly a quick and dirty setup.
For all examples shown here, I’m using a cheap and simple work light purchased from my local hardware store for about $5, handheld while moving around and firing the camera remotely (gotta love this new WiFi feature in the GX7!). I’m using a single 60w incandescent bulb, so here’s one way to play with, and get a dearth of variety from one single light, and 3.5 minutes of spare time.
First, we have Front Lighting:
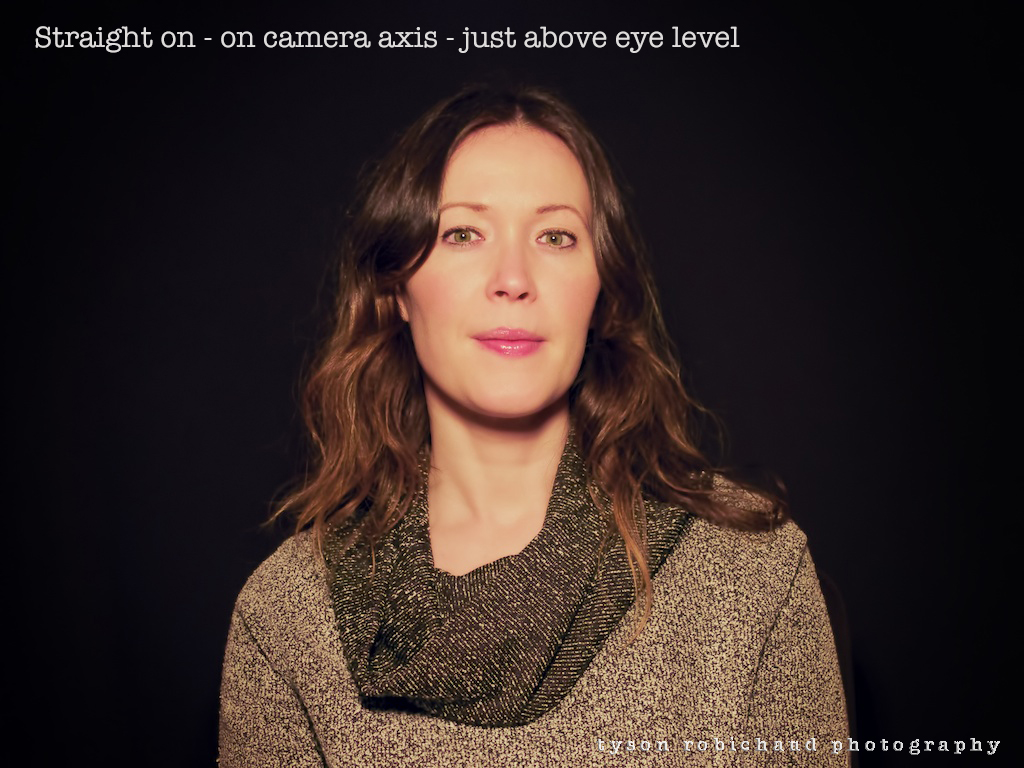
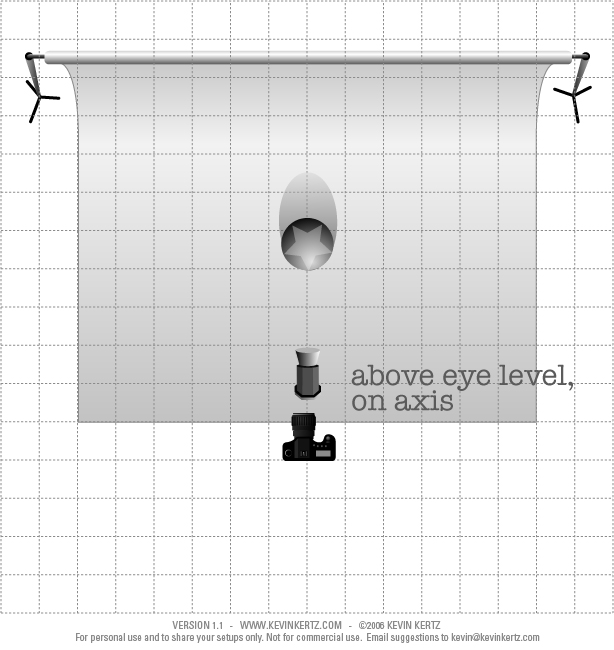
Front lighting is flat and can provide essentially shadowless light akin to a ring flash. Of course here we didn’t have a ring flash so you’ll notice directional shadow under her chin and jaw line.
45 degree lighting:

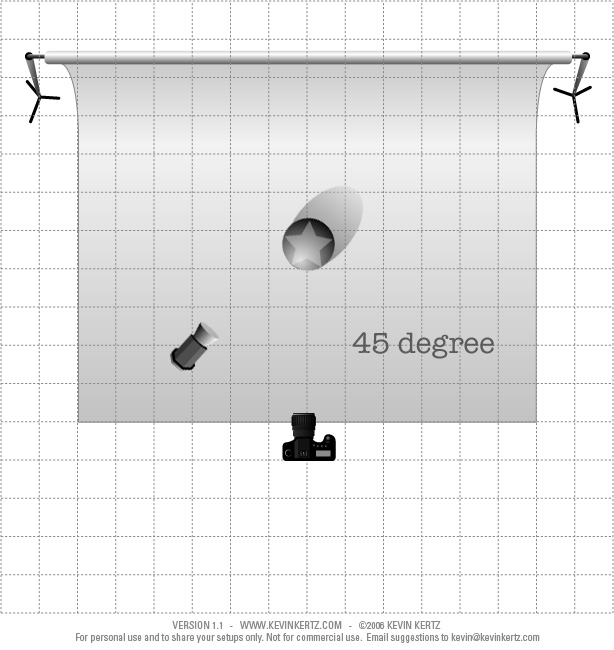
Here, we have simply moved the light to be positioned 45 degrees between the camera axis and the subject’s axis. It produces much more depth via light fall off from the highlight side to the shadow side. Add some height while not closing off the shadow side (see Rembrandt next) and you will have yourself a traditional “Loop” lighting setup.
Rembrandt Lighting:
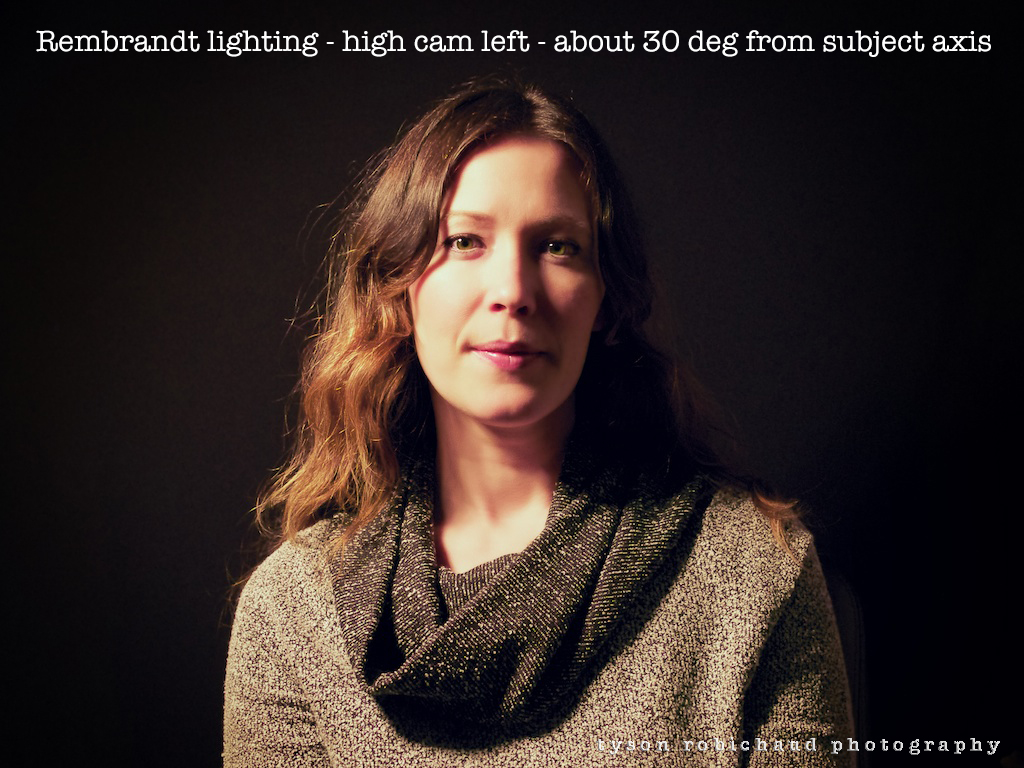

Rembrandt lighting is a simple and dramatic lighting technique. Employed by Rembrandt Harmensz van Rijn in his paintings and popularized by just about every portrait artist since, it is a slight modification on the 45 degree lighting. By getting it a little closer to the subject, raising it slightly above head level, you’ll begin to shadow the far cheek with the nose creating a triangle of light. I wrote a more comprehensive tutorial on Rembrandt Lighting HERE.
Side Lighting:
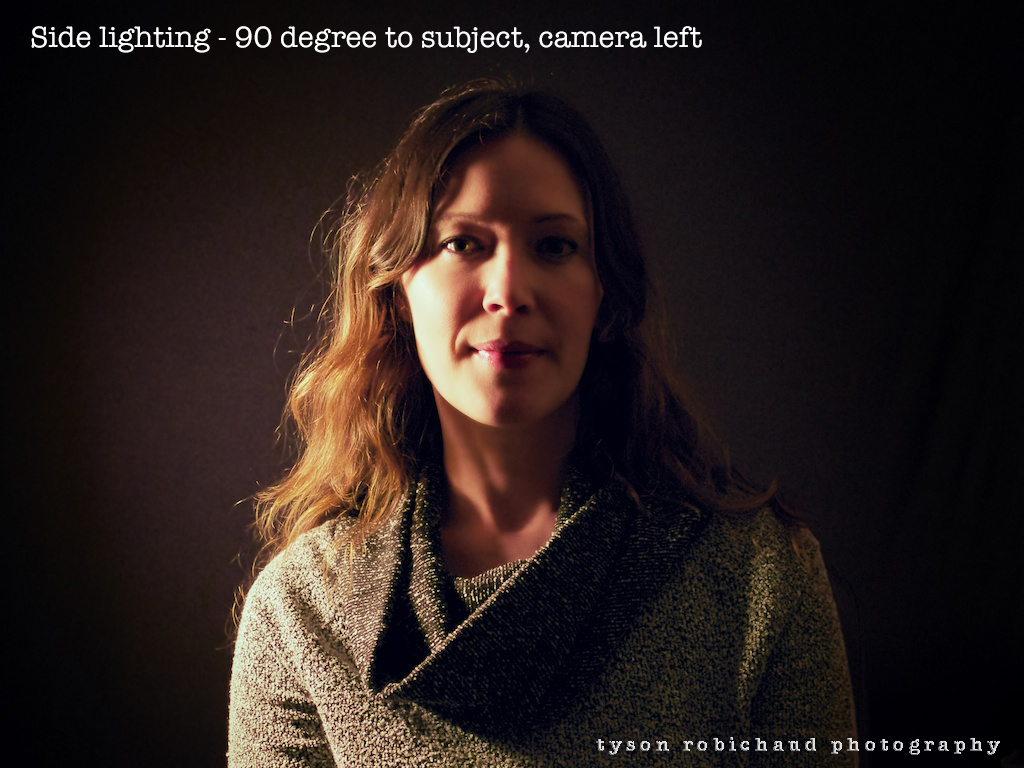
Okay, just moving on around the arc, this is a dramatic, and unflattering lighting style when using only one light. Also known as “Split” lighting, it splits the subjects face between a lit/highlight side, and a dark/shadow side. Depending on the desired effect, you can have fun with it, but without a reflector or second light source to fill in the shadow side, the fall off is harsh and this will also accentuate any blemishes or skin imperfections as the light comes across the subject, more so than just about any type of light.
Top Lighting:

Top lighting (also known as Butterfly lighting because of the “butterfly” shaped shadow cast by the nose) with only a single light can be a flattering style, but I find it works best when used with a second light to fill in the eyes and under the chin/nose. Without diffusion, it can create hard shadows below the nose and chin while darkening the eyes by the shadow cast by the brow line and eye lids. A common fix for this is to either add a reflector or second light below the subject to brighten up the shadow areas.
Under Lighting:
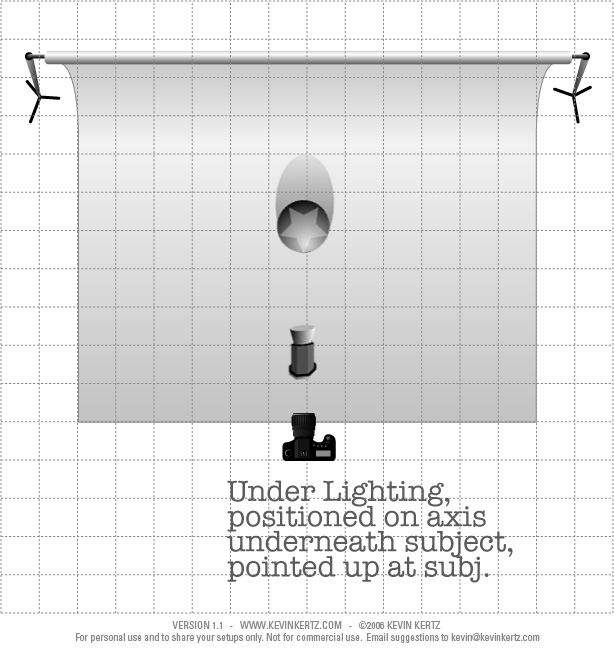
Also known as “Horror” lighting, or just “bad” lighting, under lighting is not commonly used for portraiture when using only a single light, unless of course you’re Jill Greenberg and you want to shoot John McCain. It can be used as storytelling lighting though if used well as it can emulate light from a campfire or the like.
For these examples, I had Mrs. Squeeze face the camera which is a fairly boring way to pose a subject. By angling your subject’s shoulders and bringing the face back toward the camera, you can add even more depth. Add the light to the near side of the face (the side most facing the camera) to create Broad Lighting, or light the far side of the face for Short Lighting. By incorporating this to the previous lighting angles, you can create a Short Loop, or Broad Split light, etc. Even more variables to play with!
Alright, here were 6 different, quick lighting setups to spur your curiosity. Now, go forth and experiment, and please share your images with all of us on Flickr.
This is by no means the way you need to incorporate a single light for this challenge, nor do you even need to shoot a human subject, but I wanted to take the opportunity to show you what kind of variety a cheap, single light source can produce when shooting a portrait for a challenge like this. You don’t need an expensive, high end studio strobe (although it doesn’t hurt).
One other fun distinction is to diffuse or soften your light. I used an unaltered, harsh single bulb just for illustrative purposes, but if you diffuse your light (place a piece of paper, or shirt, sheet, diffusion material) you can further soften the light making it more pleasing and gradual.
This is the first collaborative monthly challenge that Heather, Mat and I have decided to work on and hope to be able to continue to have fun with this. The idea being that we can all contribute images to the Flickr Group discussion threads (HERE – Add link) and (HERE – Add link).
If you’d like to add your image or images, please share a medium sized image in the above linked group threads. Give a description on the lighting used, the camera and the lens settings so that we all can learn through this collaborative process. Heather, Mat and I will choose our favorites and put up a post in a few weeks showcasing the chosen images which will link back to your Flickr pages to allow all of us to vote for our favorites. The winner of the monthly challenge will get to pick the next theme!
Thanks everyone and I can’t wait to see what we can come up with!
Happy shooting and all the best,
Tyson

This sounds great and just the thing to push me out of my comfort zone of reportage style photography. I was looking for something like this bit found various others uninspiring. This floats my boat and i look forward to doing it. I have a few ideas in my head already. Great idea man! Look forward to participating!
LikeLike
I look forward to seeing what you come up with man!
I too need to try and get a bit more artistically motivated, so hopefully these challenges can help 🙂
LikeLike
Hi Tyson, what are the rules regarding post processing? Can we alter much in LR or keep as true to the original as possible? Like perhaps tweak in LR or other suites as much as you could in a dark room. Lighter, darker, maybe play with white balance if its shot in raw etc? Thanks.
Chris
LikeLike
The only rule is the image needs to be lit by one light, other than that, …there are no rules 🙂
LikeLike
Pingback: Monthly Flickr Photography Challenge: Working with one light source | MirrorLessons - The Best Mirrorless Camera Reviews
Awesome cheers (that last comment was me but for some reason didn’t log in)
LikeLike
okay, lack of rules still apply 😉
LikeLike
It’s funny how so many people differ in opinion about the “correct” way to do something. I don’t have an opinion, so I’ve been watching how others do it.
A few months ago, I attended a Panasonic “Models in Motion” workshop and it was quite well lit, with some fancy fixtures, but in the end, I think it must be about what you (or your client) wants from the shoot and how to prepare for that.
I’ve got a cheapo setup with two lights just to handle a few small products. It’s fun to learn, as long as I don’t become chained to a studio.
LikeLike
Use one of those lights on something and submit a pic man! The idea is to get all of us more involved and challenging each other. No right, nor wrong, just fun.
LikeLike
I gave up on two flickr accounts already but thanks. Had it been a different time, I might have tried but for various reasons, I don’t do that any more. Enjoy it. 🙂
Maybe, I’ll drive to Oregon the next time I’m in California. 😀
LikeLike
Yes, Flickr is dying on the vine unfortunately. What used to be such a wonderful community and resource has been retooled to cater to the growing popularity of disconnected immediacy which is a damn shame.
LikeLike
Pingback: “Single Light” Photo Challenge | fishburn.me