One thing I find funny about modern digital photography, is how much we tend to revert back to wanting it to look like film. The irony of using a $600+ software program, thousands of dollars in camera gear and a bit of time in front of a computer to get an image to look like it was taken with an older film camera and some expired film is not lost on me. But, if we’ve already got the tools, why not have the ability to use them for a variety of effects right? I love vintage, or aged processing, so here are a couple techniques I have played around with to get my high resolution images to look like they were taken a while back…
There are no hard rules about vintage, or cross processed digital images as so often, the journey takes you somewhere you weren’t planning on ending up, so as long as you enjoy the result, who cares what you call it right? There are a multitude of ways to achieve an aged or vintage “look” but depending on the original image, I’ve come up with a few things to do to them that can help get them looking a bit ‘different’ lets say.
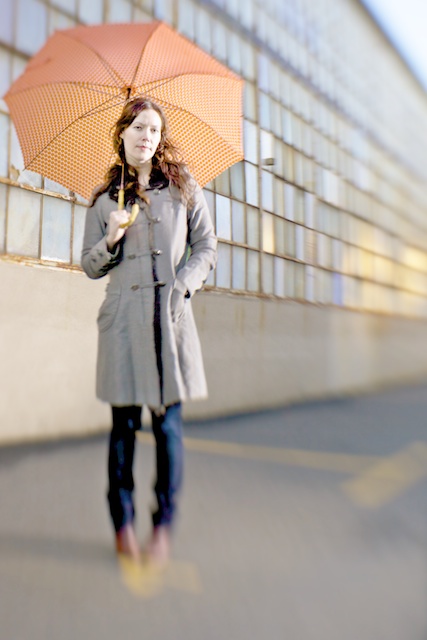
Here is my starting image straight from the camera:
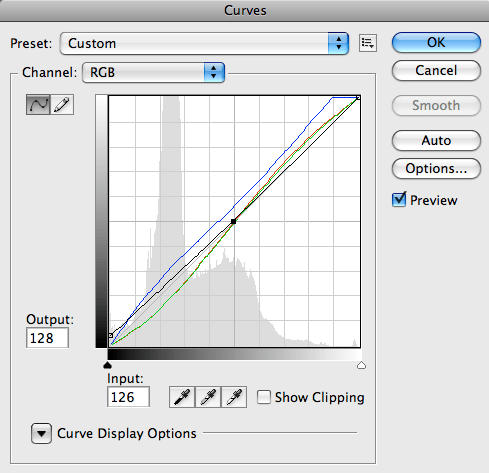
Cross process (digitally anyway): Cross processing is a film trick where you would intentionally develop / process a particular film in chemicals that are meant to process different film. This provides shifts in colors and tints. To do this with a digital file, the easiest way is to modify your curves… I like to copy my background layer and make a curves adjustment to the copy so that I can adjust the opacity of the effect, and I’m also not changing the original background layer. To add a curves adjustment layer, either click the half black/half white adjustment icon at the bottom of the layers palate and choose ‘Curves’, or, go to ‘Image’ > ‘Adjustments’ > ‘Curves’. Once in the curves dialogue, I tend to use the “S” curve method which basically has me place an anchor point in the center (midtone) and pull the highlights (or shadows) up while adjusting the other the opposite way creating an “S” essentially repeating this to an extent for each of the channels in the Channel drop down menu (RGB / Red / Green / Blue). You’re essentially changing the color of the shadows and highlights “shifting” them to show a color cast.
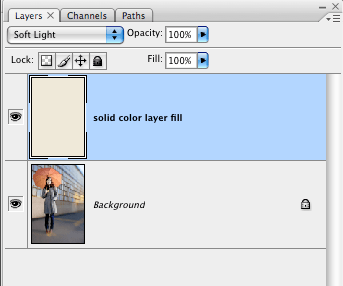
Color cast: The color of older pictures, for a variety of reasons (some intentionally), tends to fade and shift. An easy way to provide a color shift or color cast is to apply a solid color layer on top of your background layer in photoshop, and then play with the blend mode. Another way to shift colors is the cross processing techniques, see above…
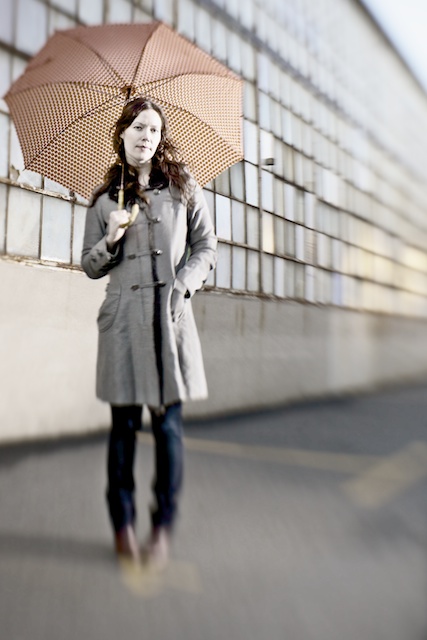
I like to use lighter colors and change my blend mode to overlay or soft light. For some shots I like a beige or off white, others I like to add a blue or magenta to lend a cool or more red color cast. In this one I used the beige and the result is here:
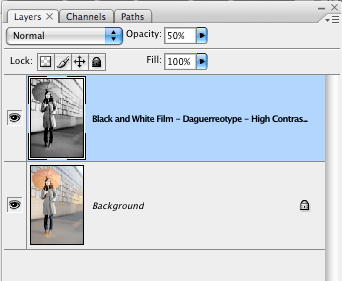
Add a Black and White layer to your color image. This is one of the coolest tricks. So many of the “how do I get an image to look like this….” questions are at least partially answered by this one alone. It can deepen the contrast, and if you tweak the color channels within the black and white image, you will alter the way that the colors are rendered in the final image after you adjust the opacity of the desaturated/black and white layer. There many different ways to desaturate an image. I prefer to use a black and white plugin like Alien Skin Exposure as it gives you the ability to apply different film presets as well as modify the highlight and shadow relationships. For this effect I wanted to saturate my blacks and bleach my highlights.
By adjusting the opacity of the black and white layer down to 50%, it allows the color image to push through while maintaining some of the contrast and monosaturation from the b/w layer.
Another fun tangent to this technique is to mask out some of the b/w layer to bring out a bright pop of color which I went over in the Selective Color in Black and White post.
Grain: If you are using a plug in like Nik Silver Efex Pro, or Alien Skin Exposure, with the click of the mouse, you can apply a simulated grain, rendering and tonality to replicate the effects of past (or current) films. If you just want “grain” an easy way to do this is to apply a “noise” layer in Photoshop. Personally, I’m not a fan of adding noise to images as I think it looks cheesy and non-film grain like, but I have seen it used to good effect, so, here is a very basic approach: Copy your background layer, go to Filter > Noise > Add Noise adjust the amount to suit and mask out any areas that you’d like to keep grain/noise free.
Vignette: Adding a vignette is an easy way to focus more on the center of your image. It also is a good way to replicate cheap, or older lenses that cannot properly help project the image circle to the corners of modern sensors. I’ve always loved using selective vignetting and tend to do it more often than trying to correct to remove it when it’s happened naturally. An easy way to do it is to duplicate your background layer and use the burn tool to burn the corners. You can also use the Vignette tool (apply to a background duplicate layer) which, in Photoshop can be found by going to Filter > Distort > Lens Correction and from here you can add a vignette. Like anything in post processing, it is salt and pepper to taste… By applying this (or any effect) on a duplicate layer, you can adjust the opacity, change the blend mode, or mask it out. If you apply any of these to your background image layer, it’s affecting the original pixels.
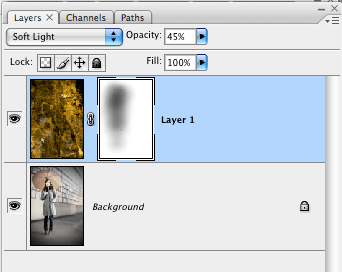
Textures: Textured layers are a fun way to add a bit of storytelling or dimension to an image. Take pictures of dirty, scratched up glass or flaking paint for instance and layer it over your image to provide elements that may lend a visual compliment to an older looking negative or print. Sky’s the limit here. Take a picture of just about anything and you can turn it into a texture. A couple keys to applying a ‘texture’ to an image is to adjust the blend mode, opacity and use of masking.
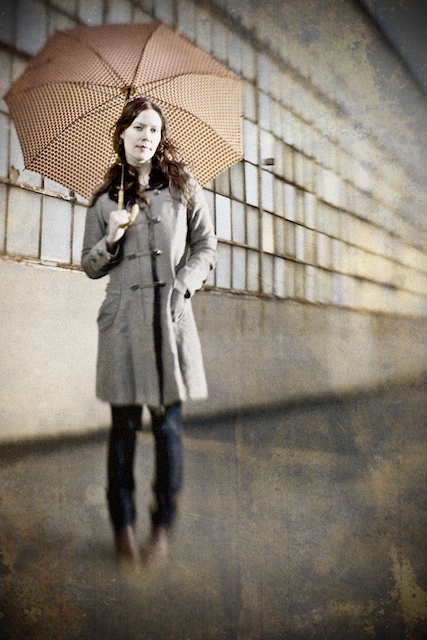
For the “final” image, I used a texture blended to softlight and lightly masked it off of Mrs. Squeeze.
There are many, many ways to apply an aged, vintage, or cross processed look to your images. These are tools I like to play around with to help. Sometimes my processing journey goes off on a tangent in mid stride (as is evident in my example above), other times I take a different route to get similar results, but no matter what, I have fun doing it. Check out some of these sites which provide anything from actions and tutorials to free, shared textures. Some sites that provide free things ask to be credited, or have specific use guidelines, so just check and be conscious of these. Many folks give much of their time and share their expertise while asking very little in return 🙂 Live, learn, shoot, share and if you feel so inclined, support these hard working folks. If you have a blog, site or know of some that you use, I’d love to add them to the list:
Shadowhouse Textures – Great library of textures and expertise from Jerry.
Coffeeshop – You’ve heard me mention Rita before. She rocks.
presetpond.com – Thomas has compiled a growing group of creative folks who share their presets for Photoshop, Aperture, Lightroom, NIK Silver Efex Pro and other software. Free and awesome.
I’d love to hear other’s tips and tricks for aged/vintage/textured processing. Those who feel comfortable sharing their trade secrets anyway… Drop them in the comments, or stop in here to add an image or start a conversation topic in the flickr group. Add your email to subscribe at the top of the page to receive new articles as I post them! Thanks for stopping by and reading through.
Some other articles on post production and software:
Free Contrast Pop Photoshop Action!
Presets, streamline your workflow
Alienskin Exposure 3, third time’s a charm.
Selective Color use in Black and White Photography
Happy shooting!
-Tyson





Another excellent technique write-up Tyson!
It is ironic, but I totally agree – why not use the modern tools we have to give our photos a specific look? There is an art to taking a good photograph in the first place (i.e. composition, lighting etc.), but once you’ve got that bit right, there is also an art to processing the final image, something which I think many people only scrape the surface of.
I guess some people won’t be happy until they’ve polished the living daylights out of an image, and others will be quite happy with out-of-camera JPEGs. Built-in art filters and such like allow instant gratification for the point and shoot crowd, as do the abundance of ‘one click’ treatments available either via plugins, actions or proprietary software, but there’s no substitute for experimenting with layers, blending, masking and textures yourself.
Like you, I have Photoshop, but for those that don’t, the technique(s) illustrated in your article can be translated to less powerful applications, even those that are available for free. So come on folks, give Tyson’s Tips a whirl in your image editor, and have some fun with your own photos 🙂
LikeLike
Thank you Alisdair,
Yes, I try to mention GIMP when I put together these types of posts as I really like to make sure folks know they have free options over photoshop, but forgot to do so this time around.
While I am a fan of pixel tweaking in many cases, I do feel that a steady hand and mindful moderation is a true talent which shows with the progressive and successful photographers of our new digital era. Any of us can obliterate a digital file with over processing (or even darkroom techniques for that matter) but the digital artist that knows how to apply (and when to stop) these adjustments becomes the more prolific image maker, in my opinion anyway. I’m still trying to wrap my head around the breadth and depth of photoshop and one day hope to be well enough versed to truly utilize it to enhance my photographic vision as opposed to create it. But, there in lies the fun… the journey!
I hope all’s well.
t
LikeLike
Ah, the journey….
Post-processing is incredibly useful, occasionally necessary, and potentially a lot of fun too. I agree though that it’s all too easy to over-cook things – “less is more” and knowing when to stop is indeed the sign of a true master!
For those feeling their way, you highlighted one of the key things to remember – duplicate your layer before editing. That way if you don’t like how your adjustments are shaping up, you can always go back to square one (or two), and experiment some more.
All OK here thanks – survived my daughters 10th birthday with sanity intact, and got some great family snaps thanks to my Metz 48 😉
Cheers, AB.
LikeLike
beauty processing… i use shadow house too 🙂
congrats!
LikeLike
Pingback: *Floating in Photoshop! «
Pingback: *Kubota Lensbaby Action Pak! «
Pingback: *Free Bleach Bypass photoshop action. «
Pingback: *The Eyes Have It. «
Pingback: *WILL WORK FOR FUN! Your questions about life, love and photography, answered. «
Pingback: *A quick, simple and free Vignette Action «
Pingback: *Everything you need to know about digital photography. Two years of tips, tricks and various freebies, revisited. «