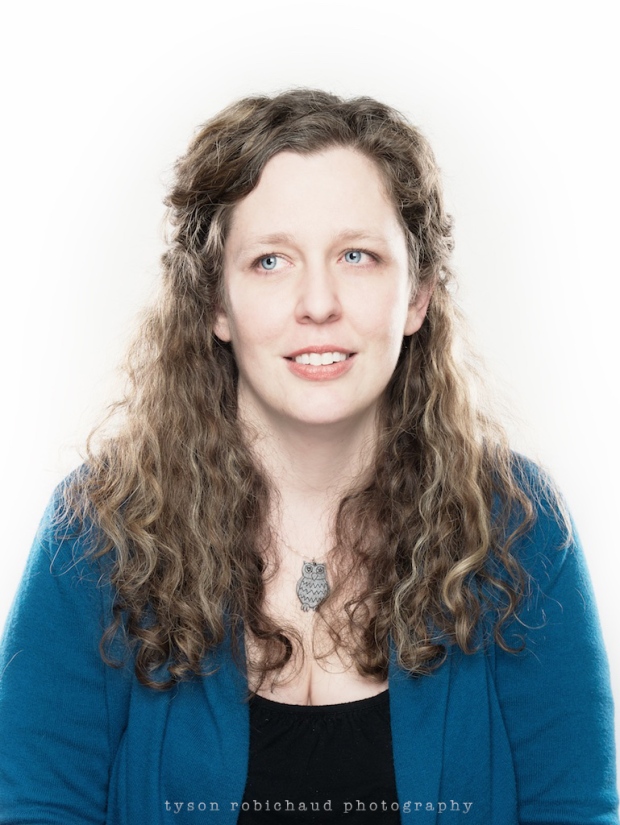
I’ve been working through some lens reviews, and wanted to take a break from the technical, to share a lighting setup. Portraiture wise, I tend to normally go in one of two directions, either very minimal, directional, moody light, or a sh*t ton of lights. This setup is the latter. Using 4 lights and a reflector, my goal for shooting with Trisha was to wrap her in light from every direction. I knew I wanted to really showcase her beautiful blue eyes, and getting enough light into them meant lighting her from the front high and low. C’mon in for the setup.
The edge lighting consisted of two lights at identical power, equidistance away through gridded strip boxes, setup vertically, at about 30 degrees off her axis, behind for the wrapping, edge light. These were powered at about a half stop over the key light (1.5:1) as I wanted to almost lose the highlight info along the edges to have it look like she was coming out of the light from behind her.
One light fired wide onto the background to blow it out. The BG was close enough to affect the exposure, which was intentional, and helped provide some rear, rim light to separate her from the white seamless.
The key light was through a small softbox on a boom above and on camera axis (see the catch lights). I dropped it down as far as I could while keeping it just out of frame. This helped remove much of the dimensional depth producing a flat light, especially when combined with the final piece.
Beneath Trisha was a white reflector to help bounce light from that key, and both edge lights, back up from underneath. It helped soften the shadows underneath her brows and chin, and brought a little bit more light into her eyes.
A fun, high key setup to wrap your subjects in light. As long as you can keep your lights balanced, and don’t blow anything out, it can be a nice, flattering and flattening light for skin.
Thanks to my friend Trisha for answering the facebook call, thanks to Kevin Kertz for his wonderful lighting setup diagram, helping those of us sharing these setups, and if you’d like to stay up on new articles, tutorials, reviews and such, you can find me via the socials, Facebook, Twitter, Flickr or Instagram. If you prefer email, please feel free to add your email address at the top right of the page here. You’ll get email alerts as new articles are released.
Thanks for the read and happy shooting,
Tyson


Love this set-up! The backlighting of the hair is a nice touch, and her skin is gorgeous — almost ethereal. Thanks for the tip!
LikeLike
Thank you Heather 🙂
LikeLike
I’d always hated the thought of a studio, but I spent about $100 on simple studio lighting and got decent effects. I’m glad to see what you can do with great lighting. Thanks!
LikeLike
I’m not a fan of it it. I prize a 3D effect in photographs, not a flat effect. This might be a useful effect where a subject has a really big nose that you want to make appear smaller.
LikeLike
While I’d never say that a single tool would be the best for all jobs, my aim is to develop as many tools as I can as a portraitist to both better understand light, and enable me to play with light to different effect. While it may go against the traditional idea of developing a personal style, I’m always bored by photographers that shoot everything the same way, no matter how technically executed that style may be, but to me, therein lies the beauty in free will and personal choice.
I appreciate you reading and sharing thoughts. Continued conversation and viewing your work through others eyes can feed constructive growth. I’ve done a couple other lighting tutorials, focused on different styles as well which may be more up your alley.
LikeLike