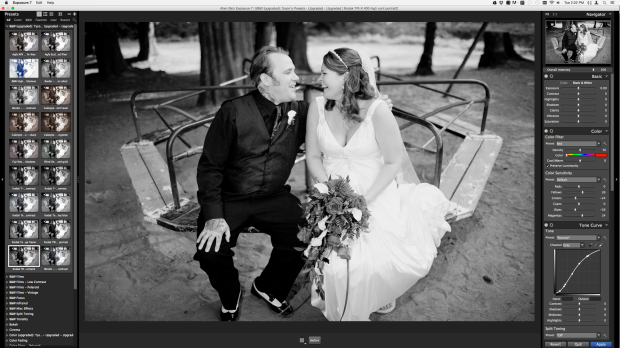
Hi all! I’m now a contributing writer for the Alien Skin website via their blog (read HERE), and this article was my first published tutorial showcasing a simple trick to add drama to any image. It is a very cool, very easy and arguably effective trick to use for just about any type of image that might benefit from a little contrast based depth and drama. I’ve employed this trick for as long as I’ve been using Exposure which has to be going on about 6 years now, and it is one of my go to’s whenever I want a bit more edge in my images.
C’mon in and follow along…
For those of us who may not be familiar with non-digital image capture, there was this process in the days of old whereby skipping the bleaching portion of color film processing, it would produce a far more contrasty image. Crushing tones and taking names, it was called, bleach bypass.
Luckily for many of us, we no longer huff photo chemical fumes in windowless rooms, yet can still reap the benefits of cool processes that came before the digital age.
In a mere 5 mouse clicks from within Photoshop, you too can replicate this effect. Seriously, I just counted in my head and it is in fact 5 clicks. For those who do not have Exposure 7, download a free trial HERE and follow along.
Click 1, run Exposure 7 from your Filter Menu:
Click 2, well, that is actually clicking on the Exposure 7 title in the Filter Menu…
Click 3, choose a contrasty Black and White filter within Exposure 7. I find it’s best to not entirely lose your shadow or highlight info on the subject(s) by going too contrasty and clipping, but the flatter the tonality in the filter, the lesser the effect we get with the next step.
Click 4, choose “Apply” at the bottom right which will place this processed version on its own layer back in Photoshop.
Click 5, change the blend mode on your Exposure 7 filter layer to “Overlay” and you’re done!
From here, you can adjust the opacity, dodge and burn to your heart’s content. It may need a little tweaking from image to image, but I find that a slight adjustment in opacity will often take care of a large chunk of the work.
For the example image I’ve used here, I did burn in the bright highlight area in the background, along with a bit on the bride’s dress, and dodged some of the darker areas throughout the image. All in all, this was about a 3 minute process total. Here are the before and afters:
It is an easy, and effective way to quickly produce a bit of drama in any image, and while there will be images that are better suited for this type of treatment, I do find that depending on my mood and desired outcome, this process can work for just about any type of image.
Here are a few more before and afters.
Five clicks.
Thanks for the read. You can download Exposure 7 HERE, either as a free trial, or by way of purchasing the software. If you do choose to purchase Exposure 7, doing so through the above link will help me out by way of a referenced commission and would be greatly appreciated. Don’t worry, the price will be the same and just allow me to continue to put time and energy into the blog with this type of content, so thank you in advance for the consideration. Even if you aren’t interested in Exposure, feel free to stick around for more articles, reviews and tutorials here. If you’d like to receive articles as they’re posted, you can add your email address at the top right of the page, or find me on Facebook, Twitter, Flickr and Instagram .
As always, happy shooting!
Tyson


Excellent write-up. What does the overlay function exactly do?
LikeLike
That’s a good question. I don’t know how to technically answer what overlay does, but much like soft light, it seems to mostly ignore color info (or lack of) and affect tonality and contrast based on the top layer. I also use overlay when enhancing eyes by painting opaque colors on a layer which tend to intensify the existing color when blended as an overlay layer essentially erasing the solid color that was painted. I wish I had both a better technical understanding as well as answer for you.
LikeLike
I don’t think the blown highlights add anything to the photos. Can this be held back perhaps by adding a layer mask, or is that the effect you’re after?
LikeLike
Bleach bypass often pushes exposure to the edges. Of course one can choose to bring them back if they want, that’s a beauty of digital manipulation, where that info existed in the first place anyway. But, other than the dress, I don’t see blown highlights on any of the image’s histograms where they weren’t pushed up to the right to begin with.
LikeLike